Forum Replies Created
-
AuthorReplies
-
I took this vertical photo of mine and cropped it to a horizontal aspect ratio, so the widescreen version has the same horizontal space as the vertical photo. So in this case you can’t say that the widescreen frame has more space in it:
I don’t think any aspect ratio “reduces screen space” overall, you just trade vertical space over horizontal space depending on the aspect ratio. If you see “Oppenheimer” in IMAX film, I don’t think you’d say that when the image expands vertically to 1.43 : 1 15-perf 70mm IMAX from 2.20 : 1 5-perf 70mm that a loss of screen space had occurred.
It’s hard to top Kurosawa for ‘scope compositions, especially of groups of people.
Leone and Spielberg are worth studying for that, 2.35 : 1 framing, as are Lean’s movies.
“Last Year at Marienbad”, “La Dolce Vita”.
Nicholas Ray and Anthony Mann movies.
Gordon Willis’ compositions in anamorphic movies such as “Klute”, “The Parallax View”, “The Paper Chase”, “Manhattan”, “Comes a Horseman”.
In terms of a looser style of widescreen framing, there are some of Altman’s movies worth looking at such as “McCabe and Mrs. Miller” and “The Long Goodbye” (both shot by Zsigmond.)
You might want to read Sidney Lumet’s book on directing; he’s the sort of director who designed a shooting plan with those sorts of structural ideas, such as in “The Hill” when the focal lengths get wider and the depth of field gets deeper as the story goes, or in “Murder on the Orient Express” where the flashbacks to the interviews with the suspects that Poirot then recalls in his summation speech were shot with wider-angle lenses in a more POV style than the original scenes were shot.
Storaro has talked about the camera style of “Agatha” where the movements and angles were more rigid and linear in the early scenes to suggest Agatha’s entrapment in her marriage, and looser and more fluid in later scenes.
You’re welcome! I was happy but surprised to win!
At ISO 400 instead of ISO 800 on the Alexa, you still get the same dynamic range, about 14.5-stops, it’s just that you’ve added more one stop of shadow detail in exchange for losing one stop of highlight detail, plus there is less noise overall.
So the latitude you’ve added is all in the shadow region. But considering how good the Alexa is in terms of highlight detail, often you can get away with that 1-stop overexposure.
Raising the ISO for a non-raw recording format like ProRes 444 Log-C in the Alexa does not necessarily mean you will have more clipping compared to recording Arriraw with the high ISO just as metadata. It’s when your recording codec is in a display gamma like Rec.709 that you get in trouble with lopping off dynamic range.
The best way to control noise is to work at an ISO that gives you a noise level you like or can live with, and then expose consistently so there aren’t major adjustments in post (particularly to the shadows.)
Assuming your codec keeps all the dynamic range in log as a raw recording would, the problems you run into are more related to bit depth, compression artifacts and to color, which is now baked in. So in that case, there can be color channel noise issues if you’ve baked in a certain color bias that you later try to remove in post. With a debayered RGB recording, you have to work in post with the colors you see in the recording.
“Expose to the right” of a histogram is a still photography concept, similar to Ansel Adam’s old adage “expose for the shadows and print for the highlights”. It has very limited use in cinematography because generally the goal is to not expose every shot as if it were unique and stand-alone, but to expose a sequence of shots for a scene so that they fall within the same range of correction (in the old days, so the shots in a scene use printer light values that are similar.) In moviemaking, you have the issue of continuity and consistency of coverage across a sequence (if not the entire movie) which is less relevant in a single still photo.
Let’s say you had a wide master shot of a room where one person is supposed to be standing in a dim area (3-stops under) whereas another person is standing under a light of moderate brightness (normal exposure) while a third person opens a curtain and is hit with sunlight that is a number of stops over.
In coverage of singles, the person who gets hit by the very hot light is naturally “exposed” to the right side of the histogram. The person under the lamp of normal brightness might have to be overexposed by three stops (depending on tones) to get close to the right. The person in the darkness who is 3-stops under in the wide shot would have to be exposed maybe 6-stops brighter to get close to the right side of the histogram!
So first issue is how this looks on the set — who is going to “fix” these radically different exposures to look as they should for the scene? A DIT maybe, otherwise the director is going to wonder why this moody scene is all over the map in terms of exposure in the coverage. And will these corrections be applied to dailies?
Second issue is that the shots that have to be darkened a lot more to get back to the correct look will have less noise than the shots that didn’t need any adjustment. In other words, the person who already was nearly at the clip point by being in the bright light might have the noise of ISO 800, let’s say. But the person who was darkened by a number of stops in post to look correctly dark now has the noise of a low ISO setting.
So for consistency of noise across coverage, you should pick an ISO that works for the whole scene and then expose each set-up for the creative look you want. If you are having noise problems with the dark areas of a particular shot, then your base ISO is too high. Some people might choose to rate an Alexa at ISO 400, for example, instead of ISO 800, just to have a lower base noise level.
Now there is some flexibility here, you can choose to “play it safe” and when you start covering the person in very dim light, you may opt to give them a bit more exposure “just in case” — but I’m talking about a small adjustment, not many f-stops of overexposure to get the subject to the right side of the histogram. You also may choose to use a slightly lower ISO in scenes where noise might be a factor, like when shooting green screens. Or when shooting subjects and sets that are very dark in tonal value.
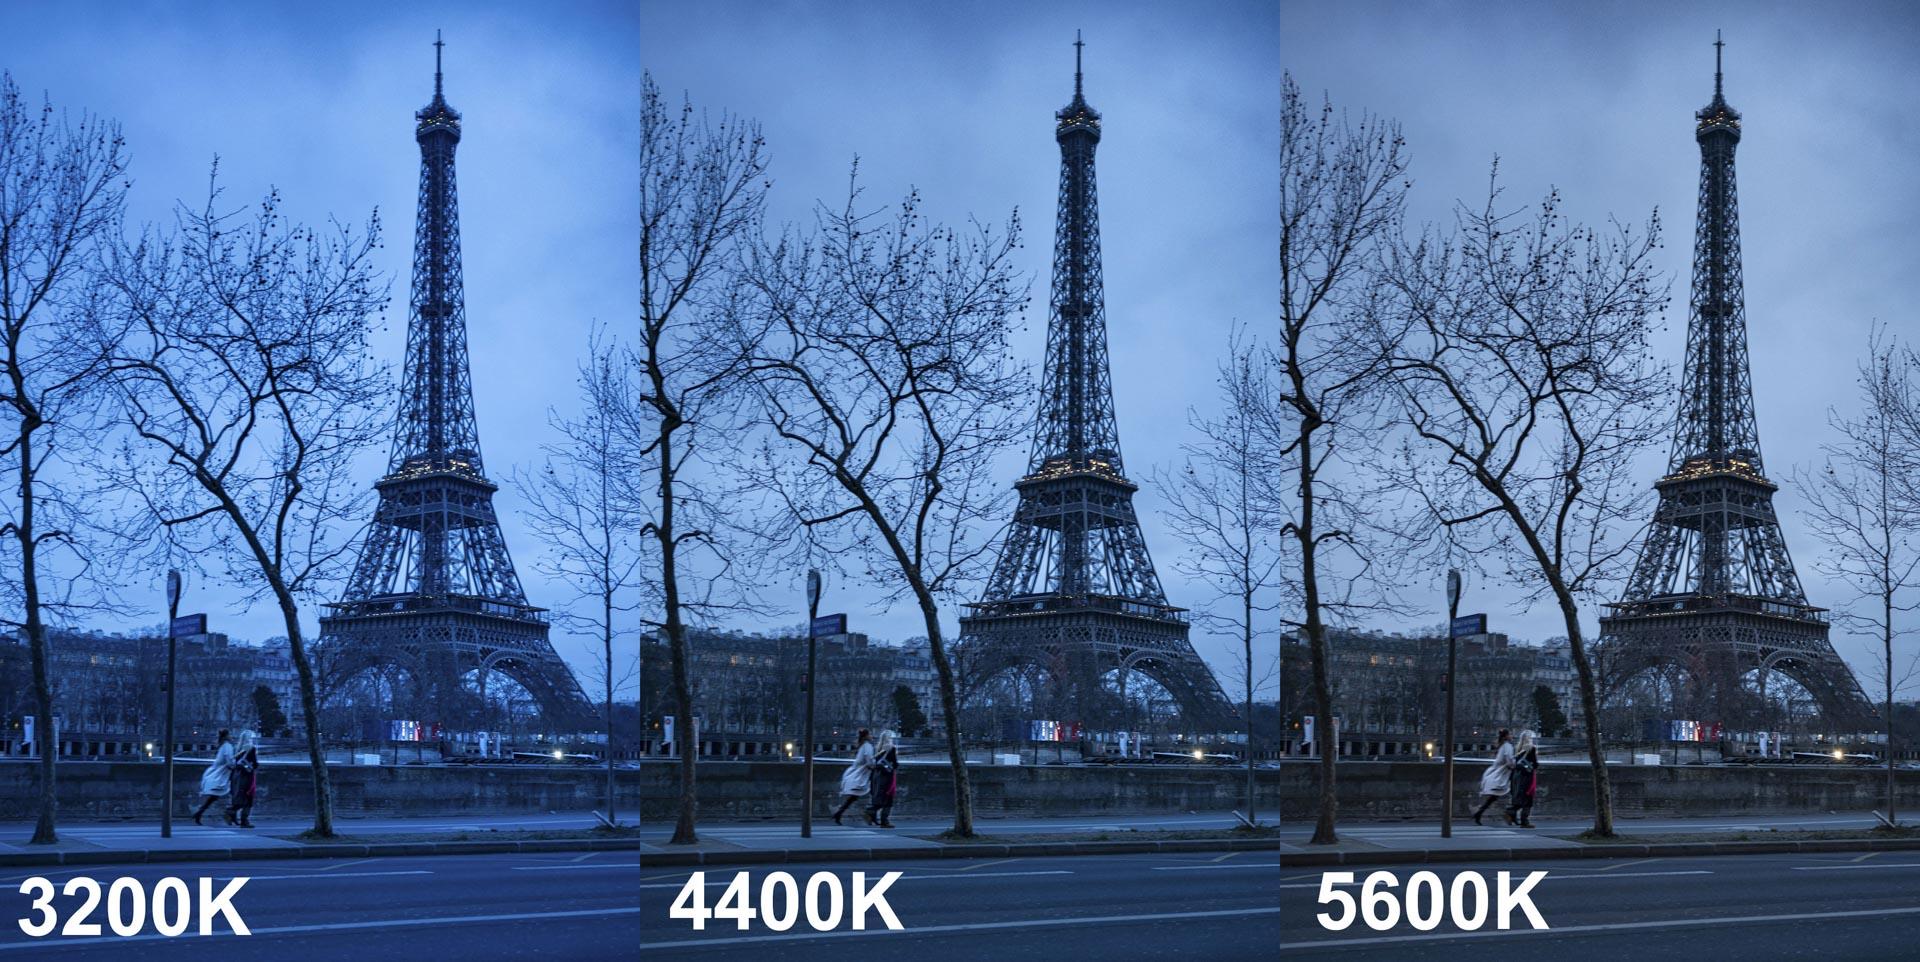
Here is a recent photo I took at twilight on a cloudy day. I shot in raw so could process the photo to any color temp setting. The thing to remember is that the level of blue is a creative choice. Also, in real twilight, the light gets more blue minute by minute, and how clear the sky is will affect the color.
Traditionally, in older movies, day-for-night or dusk-for-night was achieved by using 3200K tungsten-balanced film and removing the 85 correction filter. But keep in mind that when the movie was color timed later, the degree of blue was often adjusted to taste. Also, the blue will look more blue if there is something lit with warm tungsten light in the shot.
If a drop costs money, what about the hours of a VFX person working on compositing an image into the window? At the minimum, you could blur the view further with some 1/4 Hampshire Frost behind the window (or a stretched scrim) and then put anything outside that might create some texture, a Day Blue Muslin with some green bushes, a Tan Muslin with some black & white tape stripes to suggest window frames and pipes running up a brick wall, etc.
I don’t know about composition, but from a lighting standpoint, “Alien” (1979) is a compendium of lighting textures on faces, from ultra hard to ultra soft. In a similar vein is “Apocalypse Now” (1979).
In terms of composition of faces in close-up, it depends on the aspect ratio, but for scope movies, I’d look at Sergio Leone movies like “Once Upon a Time in the West”.
If you have people in the frame, then it’s easiest to shift strong colors that are opposite of the faces, hence why blue screens and green screens are used for VFX. So if a background is pure blue, then it can easily be shifted to blue-green (cyan) or green without affecting foreground faces lit warm. Or if there is only blue in the frame and the faces are pure silhouette like in that frame from “Vertigo”.
BUT what about the blue light spilling onto the faces, perhaps in the shadow side, so the face has a mix of blue and warmth in that area? Or any other area in the frame where the blue light is transitioning into the warm light, creating an in-between color? Even in that scene from “Vertigo” there are other shots where the green light is mixing with warm interior lighting.
Now just shifting the blue channel towards green isn’t going to look as “clean” overall compared to if you had just lit with cyan light in the first place where the blending point of colors would come out naturally with that mix of green. And it gets harder as you go further from the original blue — you can get away with some minor shift to blue-green but turning blue to pure green is much trickier in those areas of mixed colored light. So in the long run, it’s better to just light it with the colors you want in the first place — why spend time in post trying to create that effect, with mixed results?
That’s interesting, the idea that a movie takes on the perspective of so many characters in a subjective camera style that the overall effect is objective. That often seems to be the case in crime dramas, particularly with a detective / police investigator character — information is doled out to the viewer as a character learns it. And despite the subjective nature of that approach, there is also an objective tone of a dispassionate or cynical “god’s eye” view of humanity. And the truth is, most movies switch back and forth from subjective to objective perspectives.
Shallow focus was not only available to “large productions” in the past, it was available to low-budget productions as well. Even if you’re talking about people limited to smaller sensors like in the early days of 2/3″ HD in 2000-2007 or so, there were tools to get shallow focus like the P&S Technik Mini-35, the Brevis35, the Letus… all spinning groundglass attachments that allowed one to use 35mm lenses and get that depth of field.
No single technique is better or worse than another, it all depends on whether it is wielded by an artist or not — and Greig Fraser is an artist, he’s proven that on many productions.
-
AuthorReplies