Search Results for 'no'

Posted on by

Home Forums Search Search Results for 'no'

Viewing 15 results - 1,711 through 1,725 (of 1,795 total)
  • Author
    Search Results
  • #170134

    In reply to: Alexa 35 vs Mini LF

    gabj3
    Participant

      I should emphasise –

      The Alexa 35 has some crazy internal circuitry on an analogue sensor level.

      They’ve gone against their previous statements –  by creating a physically smaller photodiode with greater latitude and higher sensitivity. It isn’t inherently a good thing but is just an update on circuitry on their ALEV chipset.

      If they used the same circuitry on a larger photosite they would achieve even greater sensitivity – however, to do so and stick to the 4k mandate an LF-sized optical block would be required.

      I should note, when I talk about circuitry I’m not talking about some magic source, its generally quite simple physics – it’s more just actually fabricating the silicon.

      All CMOS cameras have a photodiode (charge as the electrons absorb the Magna of energy from photons) a reset switch (the shutter) that shorts the diode every assigned interval, a power source follower – an amplifier/gate that the charge generated by the photodiode dictates the amount of VDD (voltage) that passes through the MOSFET transistor in which there is a capacitor for ‘global shutter’ cameras and a column-line readout switch.

      Now, that’s all reasonably simplistic until you have made it 2.2micrometers wide and tall, and mitigate SNR while dealing with unimaginably small amounts of voltage.


      Infinityvision.tv
      Gabriel Devereux - Engineer

      #170133

      In reply to: Alexa 35 vs Mini LF

      gabj3
      Participant

        It won’t make other cameras ‘obsolete’

        Going away from the ‘new colour’ and ‘new logarithmic container’. Which, by all means, is just a different way of storing value.

        Any tristimulus observer – any camera with three channels can resolve ANY colour. Yes, this does mean that a Canon T3I rebel and ALEXA Mini LF Super 35 Pro Colour 65 can determine the same amount of colours.

        The balance is the initial spectral sensitivity of the sensor concerning the XYZ Space / LMS cone function gamut or, as an alternative, the camera’s Wide Gamut’ space.

        However, as they’ve changed the size of their photodiodes and, therefore, the spectral sensitivity of each camera – while possible to be remapped to the initial AWG3 (note ARRI’s 65-point LUT that will re-map the colour near perfectly), a 3×3 Matrix (internal OETF) will not as with all 3×3 matrix’s they’re error-prone as they are inherently over determined as we’re trying to match any arbitrary spectral light.

        They rebranded it as ‘new and exciting.’ rather than ‘sh*t we can’t match our old gamut anymore’.

        So, what is remarkable about the Alexa 35 is the apparent SNR of -100db and, with that inherently, more camera latitude DR in which they needed to create an extended logarithmic container to store the additional values (that’s it).

        This is a marvel in internal camera circuitry – and I am, for one, looking forward to taking it apart. However, that doesn’t inherently make other cameras obsolete. Unless you were clipping signal left, right and centre and constantly struggling to gain exposure – there is not much difference.


        Infinityvision.tv
        Gabriel Devereux - Engineer

        #170131
        GianniRanzuglia
        Participant

          Hey,

          A polariser filter would help reduce the amount of reflections, but it won’t get rid of all of them, also be careful when using one as they reduce the exposure. I haven’t  read the script nor seen your gear list, but a china ball can spread the light source quite a lot.

          I’d consider flagging and controlling the angle of the china ball, so you’re reducing the amount of light that is hitting the walls/furniture the window is facing, resulting in less reflections on the mirror.  Maybe I’d do as you say and use a flower pot to cover the camera’s reflection and move the table/scene to the middle to build a larger depth. But again I haven’t read the script so my advice may be inappropriate.

          #170113
          Scott Lancaster
          Participant

            Thank you for providing such wonderful resources for filmmakers.

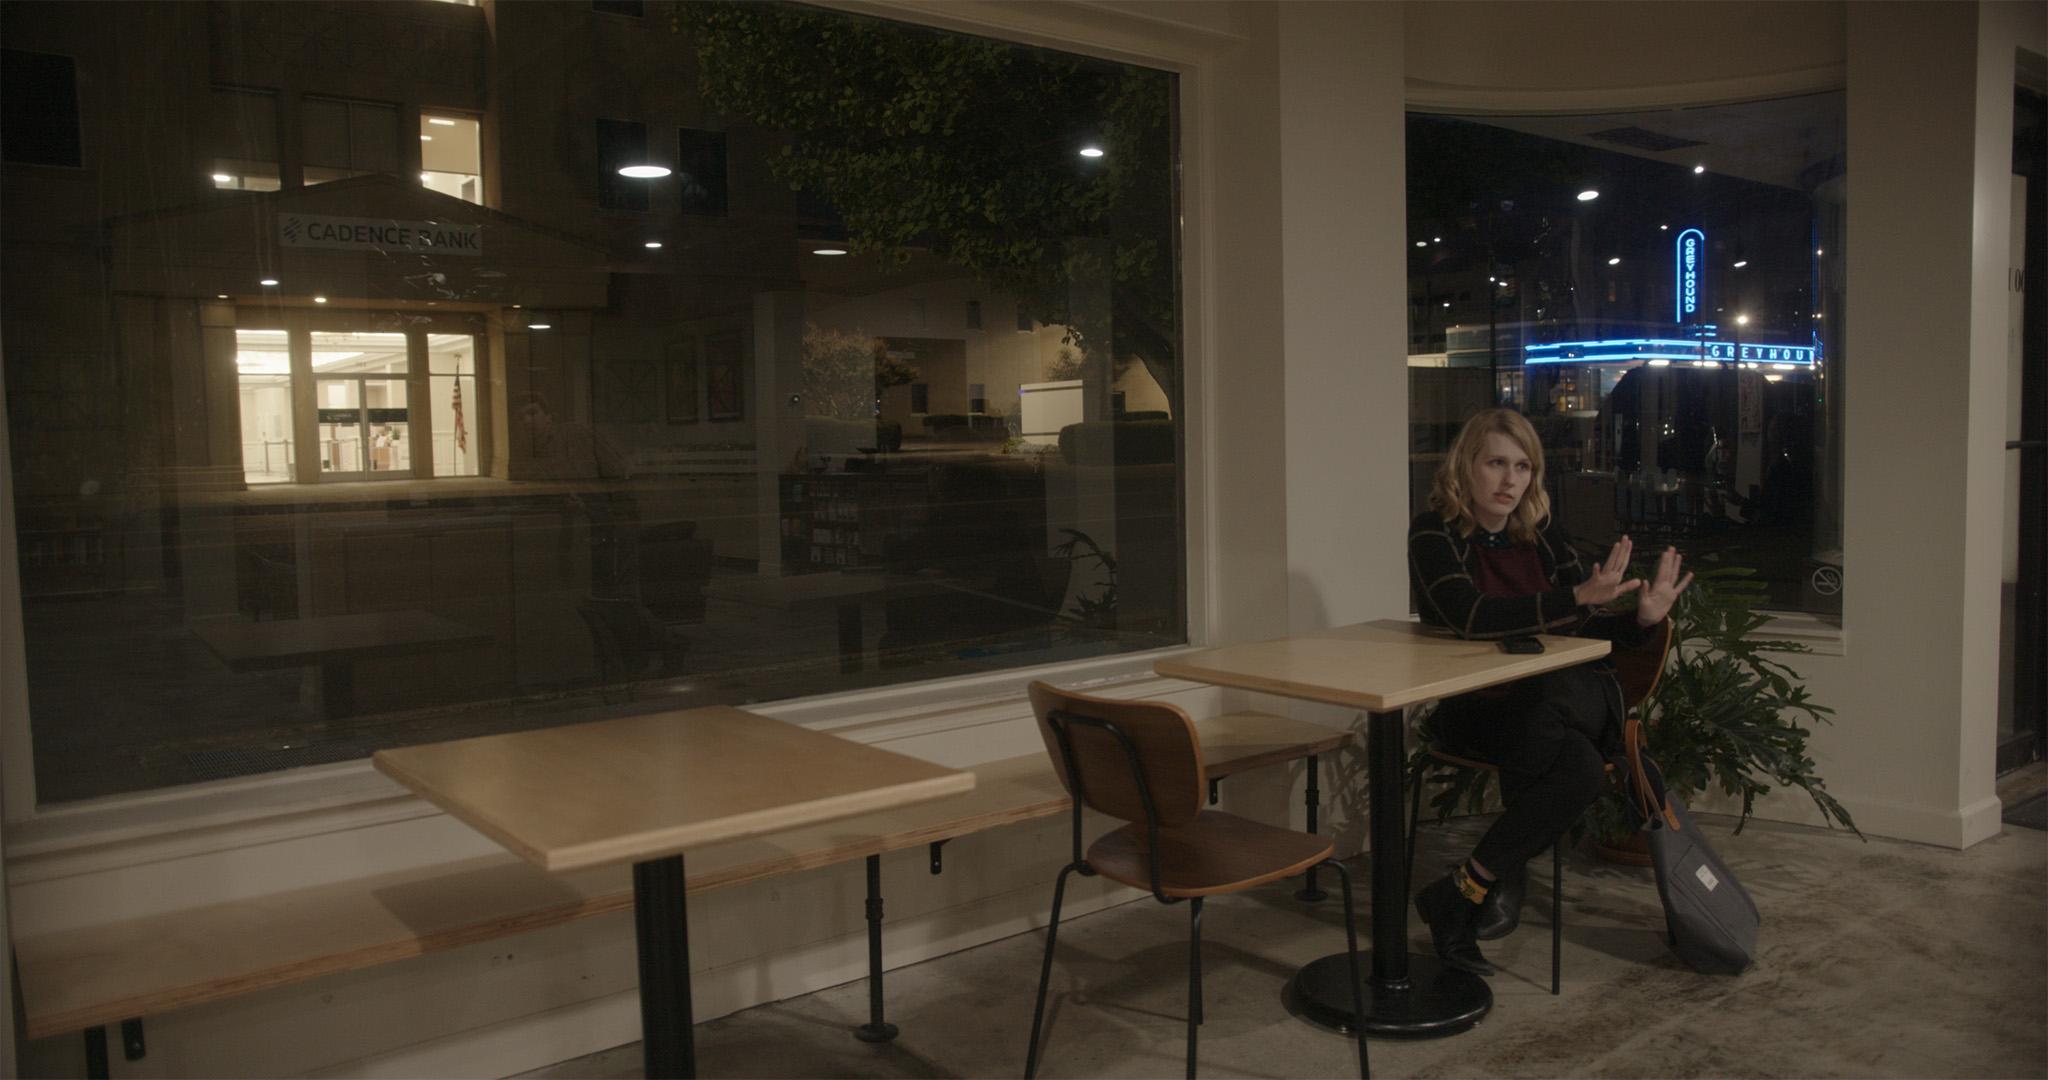
            I will be the cinematographer on a small short film scheduled to begin production in December.  There is a scene that takes place inside a coffee shop at night.  One location we are considering has these huge plate glass windows that look out on a city street with a neon lit bus station across and down the street.  I love being able to see the city lights and activity behind the table where the two characters would be sitting.  However, I am concerned about reflections of the camera/crew in the windows… especially on a symmetrical master shot where the camera is straight in front of the table and also on any wide shots.  My initial thought on lighting the table was to use a china ball hung over the table between the actors and the wall/window as my main source and then build from there.  Does anyone have any tips or advice on getting rid of reflections when setting up a shot like this?  How much would a polarizing filter help?  I thought about having something on the table that could block the camera from the window for the straight on 2 shot, but not sure if I could have anything large enough to do the job.  Maybe I need to look for a new location or just have the actors at a table in the middle of the space instead of against the windows.  I have attached a frame grab I took of the location last night while our director was speaking with the shop owner… (not lit or color graded, etc.)  Any advice is greatly appreciated!  

            #170085

            In reply to: 1917 Camera Setups

            GianniRanzuglia
            Participant

              I don’t think I could come up with a better idea, nonetheless, that was an amazing work done by you and the crew considering it helped tell the story, and none of the work seemed noticeable enough to disturb the scene. Up until I heard your commentary, I thought the scene was done sorely through a steadicam rig.

              Thanks for your answer!

              #170066
              fahadmirzaaa
              Participant

                Thanks so much for the advice!

                i really like the idea of blocking the light from the panel to create a small slit of ‘tube’, will def implement that, but for now i don’t have proper gear to rig the light overhead so ill either use a light stand setup or try to get the aputure MC as close as i can while maintaining the look.

                thanks again for the valuable tips sir! 😀

                #170064
                fahadmirzaaa
                Participant

                  thank you so much for the reply

                  i have access to GVM 800D panels (not the most powerful lol) but i get what you’re saying with the negative fill, i have a large 4×4 flag and ill be using that along with some diy setups to cut as much light as i can.


                  thanks again for the valuable tips 😀

                  #170050

                  In reply to: Aspect Ratios

                  Roger Deakins
                  Keymaster

                    The Coen Brothers wanted the ‘old film’ to introduce “A Serious Man’ so 1:33 gave that feeling. Otherwise, the film felt quite intimate and naturalistic. I suspect that is why we chose 1:85.

                    Some directors just like to shoot 2:35 and that is just a given. Personal choice. Nothing profound.

                    #170041

                    In reply to: Alexa 35 vs Mini LF

                    Roger Deakins
                    Keymaster

                      I am not sure why the 35 would be that much more advantageous than the LF. Lighting is lighting. But, sad to say, many of the number crunchers see no difference between having enough light and creating the right light.

                      • This reply was modified 2 years, 11 months ago by Roger Deakins.
                      #170040

                      In reply to: 1917 Camera Setups

                      Roger Deakins
                      Keymaster

                        If you have another idea please can you let me know. Given the camera had to move across two tables and between characters we could think of no alternative to a Technocrane. Well, we could have rigged the camera on a wire, which was my first thought, but this might have been even more complicated.

                        #170037

                        In reply to: Place scene-Unbroken

                        Roger Deakins
                        Keymaster

                          Yes, the Spacelights were gelled with a 1/2 blue and some of the Blondes carried a 1/4 blue. Given the diffusion warmed the light the resulting color was just a little cool, which made sense to me as the camera was set at 3,200K. The lower 2K lamps were a mixture of 1/4 blue and clean. I’m not sure why you are confused about the shot you post as this would have been lit by the pattern of Blondes projected through the diffusion.

                          #170033
                          Stip
                          Participant

                            I agree location is important and grey tiles explain the falloff at the back. If you find a fitting location, one of your panels should be enough to recreate this but you’ll need to test.

                            #170025
                            Al Duffield
                            Participant

                              Interesting, I started writing some thoughts but decided to look up the short that you referenced and found the still above to be quite misleading, I later realised I could one the full image in a new tab and there was the missing information.

                              With that said, the back wall is tiled in a dark tile, likely a dark grey that appears semi-matt, which explains the apparent falloff. It may be worth looking at location or to production design to assist with this aspect.

                              I agree with Timo’s comments on using a lot of negative files and that the light is likely a Kino / LED equivelant. Though I don’t think it’s a long as the full length of the bath, simply because the top lip and upper eye sockets are in shadow, and the falloff suggests to me that the light is quite close to the talent. leading me to think it’s more likely to be a 2′ kino wand or similar.

                              The best advice I can give you however is to just run a test shoot – if you own the gear you’ll be able to get to the ballpark with an inanimate object as stand-in and forgoing the the water. If you’re limited to the 3 lights you have access to, then use them. If you are “gear poor” but “time rich”, you can try:

                              • create a strip light, similar to a Kino tube by taping some black plastic to the front of the panel leaving only a slit around the width of a T12 tube. It will get you in the ballpark, particularly if you’re putting a skirt on it.
                              • Creating a bubble with some 216 hanging from your panel is an even better emulation of a tube light (where you take the diffusion and allow it to sag in the middle, so that it forms a “U” shape hanging off the panel light.). Though as you’re putting a skirt on the light the bubble is pointless extra work.
                              • If you don’t have grip equipment to suspend the light safely over your talent (who’s lying in a bath of water), try lighting the ceiling and use cutters and washing to create the slit of light overhead (though dealing with reduced falloff may not work for you, if it’s that or an unsafe setup using mains power, I know which I’d chose).
                              • you could likely even get to stop with just the small MC and a homemade snoot.

                              That or just hire a Kino wand kit 🙂

                              #170023

                              Topic: 1917 Camera Setups

                              in forum Camera
                              GianniRanzuglia
                              Participant

                                Hello Roger,

                                I recently finished watching your audio commentary on 1917, and I was really intrigued by the scene inside the bunker room, where George and Dean’s characters are informed on the mission.

                                In the commentary you said the camera is attached to a stable eye, which is being lifted by a technocrane, slowly moving forwards. When the actors move, the camera is then taken off and carried by a grip, and whilst that happens the technocrane is being retracted and the ceiling is put back in place for the final shot of the scene.

                                Why was the scene shot like this? I was very surprised when I heard this, and I’m wondering if you had thought of another way of shooting this scene first? It sounds like an awful lot of work and I never would have guessed it was shot like this.

                                Lastly, I wish to thank you for taking the time to record your commentary, it was an amazing and very technically insightful audio track.

                                Thanks for your time!

                                #170019
                                TimoVanLierop
                                Participant

                                  What kind of panels do you have?

                                  What I would do is this:

                                  Led Tube with a snapgrid in the length of the bath from above on a boom arm. Or a kino 4ft 2 bank could also work nice. Because most bathrooms are pretty white negativ fill is your biggest friend here. I would make a black tent to block as much light and to avoid light bouncing (from all the white in the room and bath itself).


                                  With your resources I would do this:


                                  Mount them next to each other to create a long and narrow light. With black cloth block as much of everything what’s not in the frame. And create some barndoors/grid for the led panels so the light is not spilling that much. When I didn’t have the resources I used black t-shirts, tape, black trashbags and that kind of stuff to create snoots/barndoors/grids.

                                Viewing 15 results - 1,711 through 1,725 (of 1,795 total)